"We don't have any volunteers"... "There's no place to take photos near our shelter"... "We can't take them outside"... "Our staff is so small"... "We're too busy"... My excuses were many. But one day I asked myself, "Do I want to spend all my time euthanizing animals, or push myself to make this happen?"
TEN SIMPLE STEPS THAT IMPROVED MY SHELTER PHOTOGRAPHS
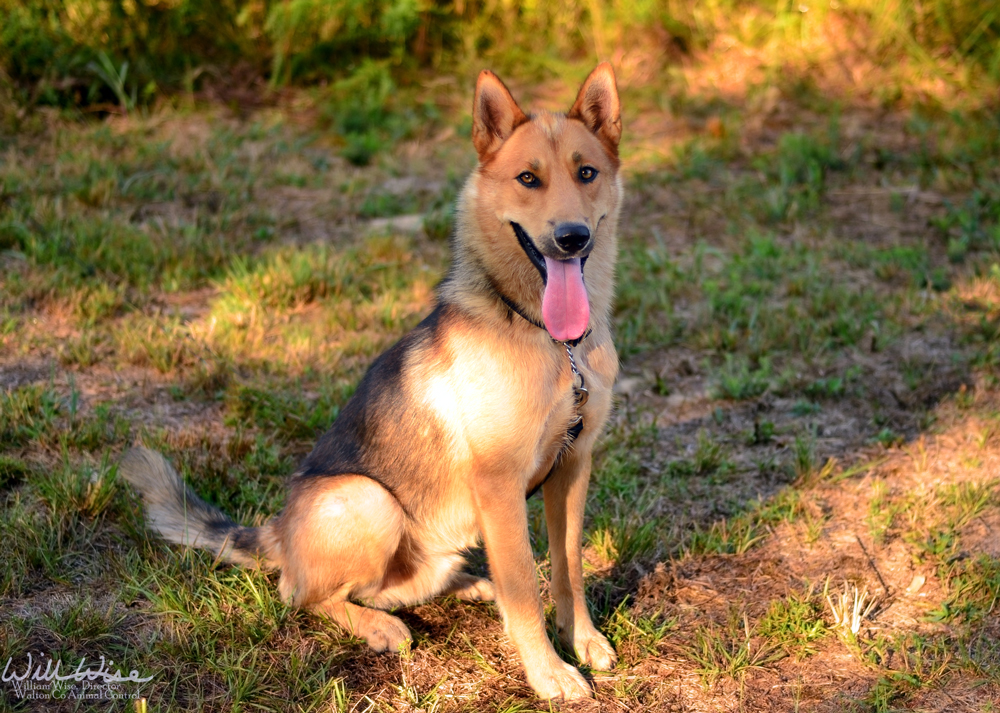
#1 Take the dog outside
Simply taking a dog out of the kennel can greatly improve the photograph.

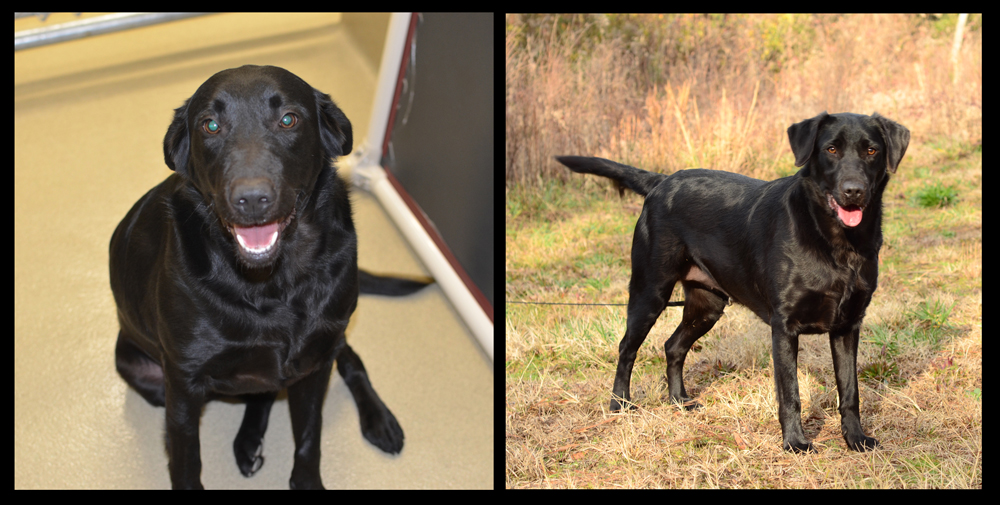
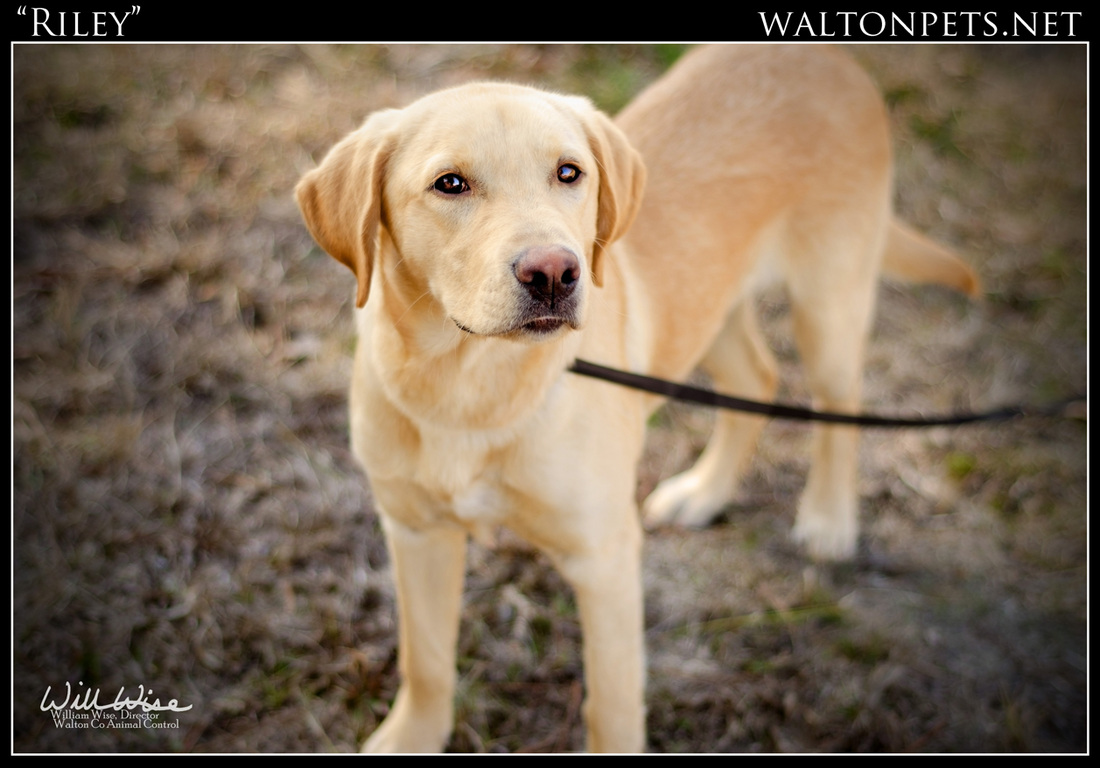
The first way to greatly improve your shelter photo is to take the dog outside! So simple, yet so effective. Not only is the lighting and background better, but the dog is usually more relaxed and looks less stressed (and can use the bathroom too!). The first shot of "Lennon" (left, inset) was in his kennel. He was a bit more nervous and kept his ears pinned back. He was much more relaxed when outdoors, showing off those glorious ears! "Lennon" came in as a stray on 8/22/14. He was adopted just four days after posting his photograph on our website.
I found it doesn't take too much effort to go from poor to excellent!
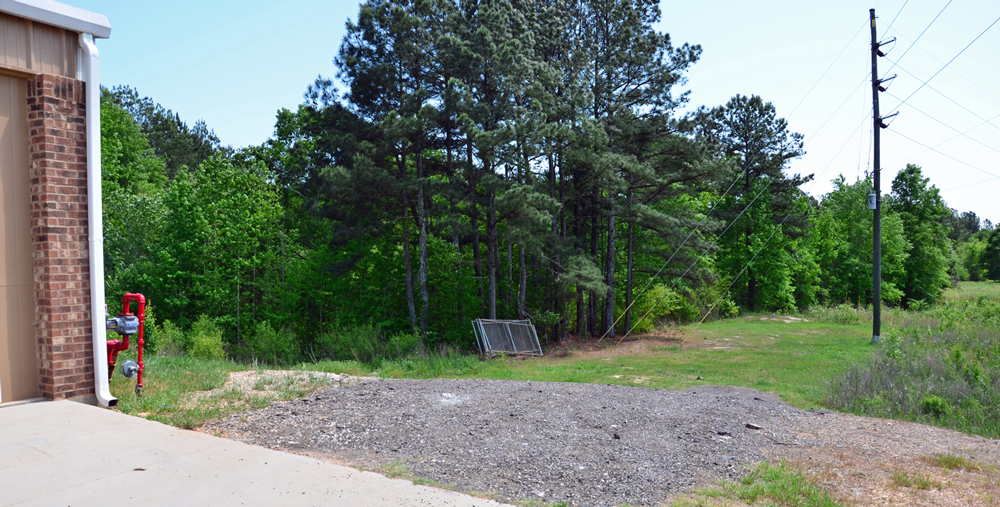
"But we don't have anywhere to take them out at our shelter." Excuses! You don't need to be near a park or beautiful nature area. Just about anything will do. I take almost all of our outdoor photos on a small patch of pine needles at the base of some guy wires on a right-of-way just behind the shelter (left). Even if you don't have that, you can take the dog outside on an overcast day, zoom in to fill the frame with the dog's face, and exclude the background from the photo.

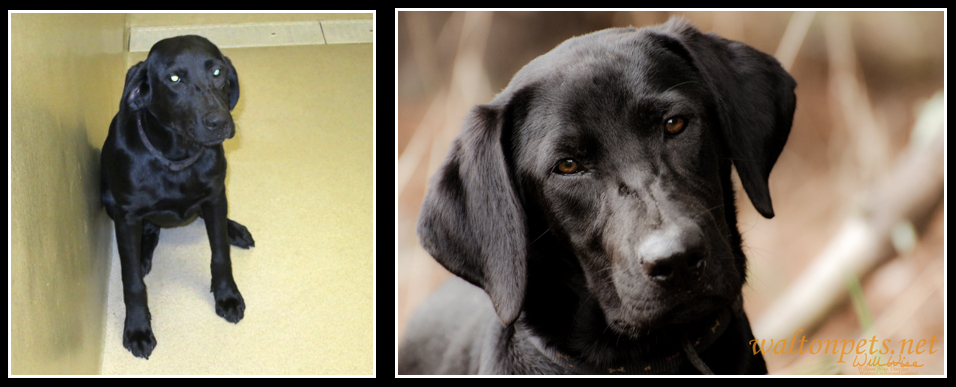
However, some small “lap dogs” look out of place outdoors, so keep in mind what “kind” of dog you’re shooting and pick your location appropriately. "Howie" (photo left) looks out of place in the woods, and his coat blends in too much with the pine needles. His photo would have been much better indoors, or in someone's lap.
#2 Shoot in the shade rather than full sun
Shooting in the shade or on overcast days removes the harsh lighting and can change the feel of the photo.
As much as I can, I shoot on overcast days, or early in the morning before the sun comes up too high. I also have a spot along a wood line that affords some shade for afternoon shooting - but even in the shade or on a cloudy day, keep in mind the position of the sun. Shoot with the sun behind you so light is cast on the front of your subject, not its back.

Here is another example (left) of the difference between shooting in full sun and shade. The left photo was shot in full sun with "fill flash" (flash turned on) to help get rid of some of the shadows and fill in details, but still, the photo looks harsh. I walked "Mojo" 50 yards down to a shadier spot and got a much more pleasing photo without the harsh glares and shadows of the full sun photo.
Keep in mind that overcast skies and/or full shade is better than spotty sun. This photo of "Gavin" (left) is good enough, but the areas of sun and shade make it less pleasant to the eye. The spot of sun is causing a "blow out" on his shoulder. Again, it's a decent photo and can get the job done, but full shade would have been better.
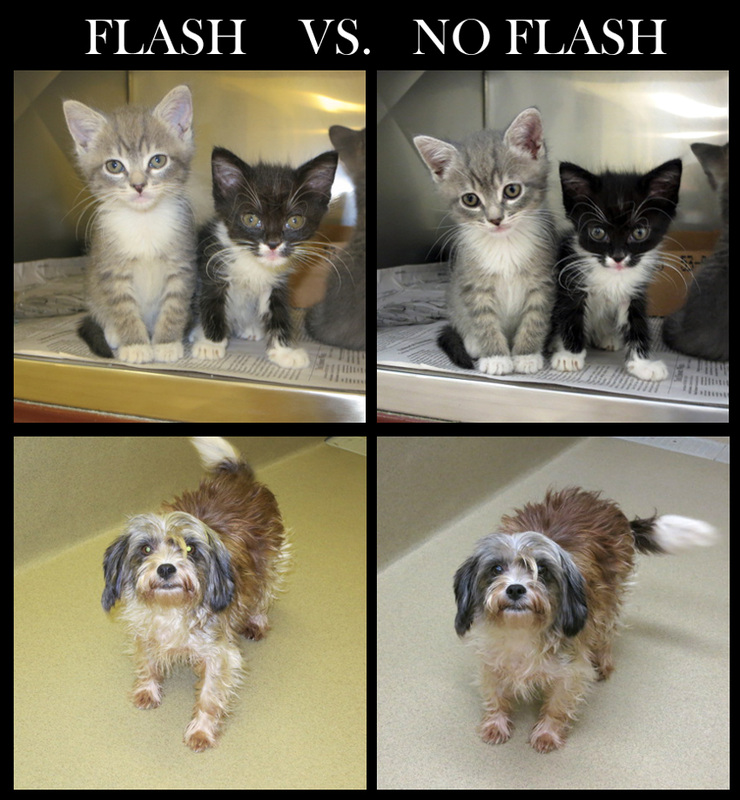
#3 Turn off the flash (almost always)
Flash is usually your enemy. It casts such harsh, unnatural light on the dog or cat, usually causing that greenish glow in their eyes (like red-eye in people). If you shoot in the shade, your camera may want to pop up the flash. If you are shooting indoors, the flash will automatically fire, so turn it off! Instead of just shooting in full auto, learn how to adjust your flash settings (auto, off, on, fill flash). Whenever you can, shoot in the shade and turn off that flash!
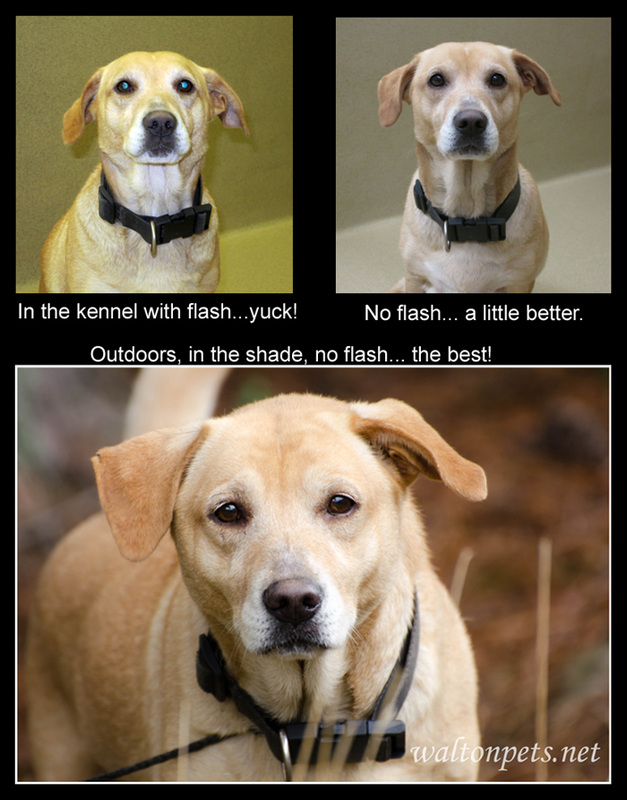
The first photo in the collage on the left is in the kennel with the camera in full auto mode, causing the flash to fire. Notice the green eyes and greenish tint to the background. The second photo (top right) is improved by switching the camera to "P" mode and turning off the flash, but the bottom photo utilizes tip #1 (take the dog outside), tip #2 (shoot in the shade) and tip #3 (turn off the flash) to produce the best photo. The effect is so dramatic it almost looks like a different dog in each photo.
Even if you are forced to photograph indoors, going without flash is usually better. The photos to the left were taken with a basic point-and-shoot camera. In the fully auto mode, the flash always popped up and fired, causing green eyes and ugly lighting in the left-side photos. I switched the camera to "P" mode and turned the flash off. As long as the animals sat still for the photo, the pictures without the flash were better. Switching to a DSLR will help improve them further (see the next paragraph).
Because we are an open-intake shelter, animals are constantly coming in, and the threat of euthanasia is always looming if we can't get them out quick enough. Therefore, I try to get the animals posted as quickly as possible. Since I am frequently pressed for time, the first photos I post on waltonpets.net are of dogs inside their kennels. This is good enough for people to get an idea of what a dog looks like, but the "in the kennel" photos are rarely too good, especially if taken with flash. I've managed to improve the in-the-kennel shots by using a high quality DSLR (Nikon D7000) and a 35mm prime lens. I manually set my camera for f/1.8 and 1/125 seconds. The auto-ISO cranks way up, and the photos have a lot of noise, but that's no big deal for publishing small photos on the web (too technical? Learn what it means; it can save lives!). Most point-and-shoot cameras need flash indoors, and aren't good for taking shots in the kennel.

There are times you need to use your flash. When you are forced to shoot in full sunlight, or when a background is very bright, turn on your flash (a.k.a. "fill flash") to put some light on the dog or cat. This will help eliminate some of the sharp shadows caused by the overhead full sun. Occasionally, I try the “cat on the window sill” shot. Without flash, the light from the window will cause the cat to be a silhouette. Because the light from the window is bright, your flash will not automatically fire, and you will have to manually turn on the flash.
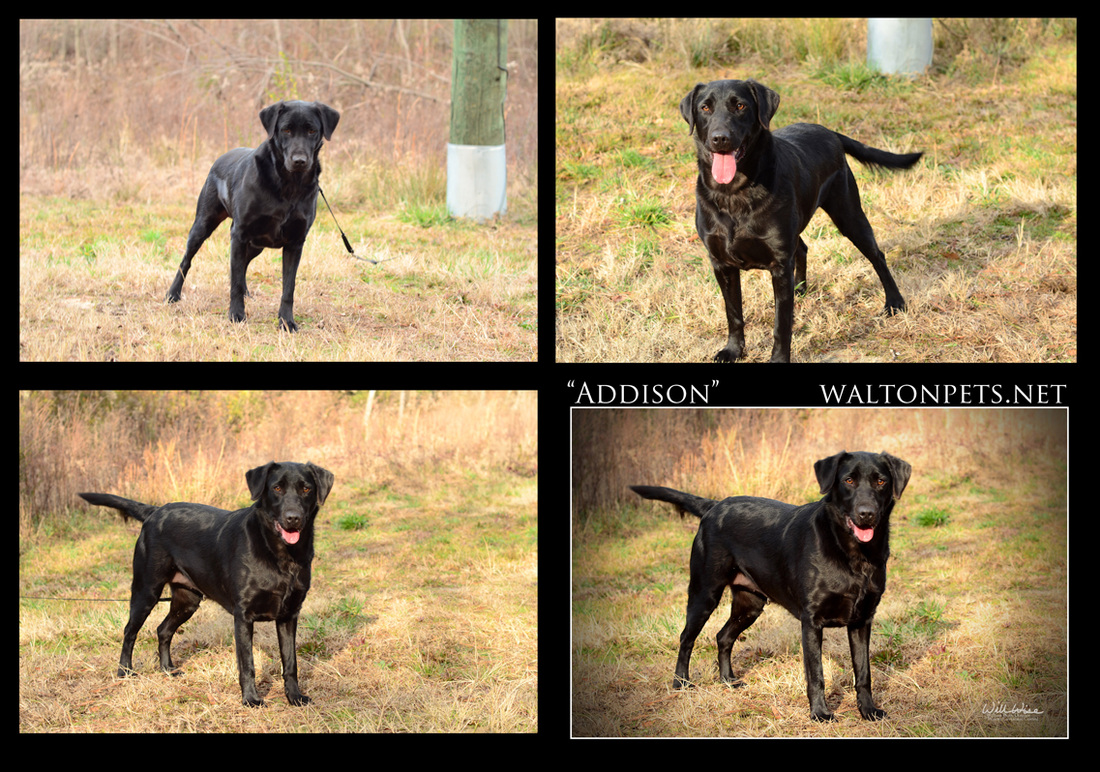
The photo below illustrates the power of utilizing just the first three tips. The top row left photo shows the typical animal control intake photo with the dog behind the bars and the flash blasting the picture. This might win the sympathy vote and get the poor pup adopted, but let's try a little harder. The top middle photo has ugly flash. The top right photo utilizes tip #3 and turns off the flash...much better, but let's go outside.
The bottom row of photos utilizes tip #1 and takes the pup outdoors. The bottom left photo is full sun with harsh shadows and glare. The bottom middle photo uses "fill flash" and helps bring detail to some of the shadows. The bottom right photo is taken in the shade and is the best (except for White Balance issues, see tip #4).
The bottom row of photos utilizes tip #1 and takes the pup outdoors. The bottom left photo is full sun with harsh shadows and glare. The bottom middle photo uses "fill flash" and helps bring detail to some of the shadows. The bottom right photo is taken in the shade and is the best (except for White Balance issues, see tip #4).

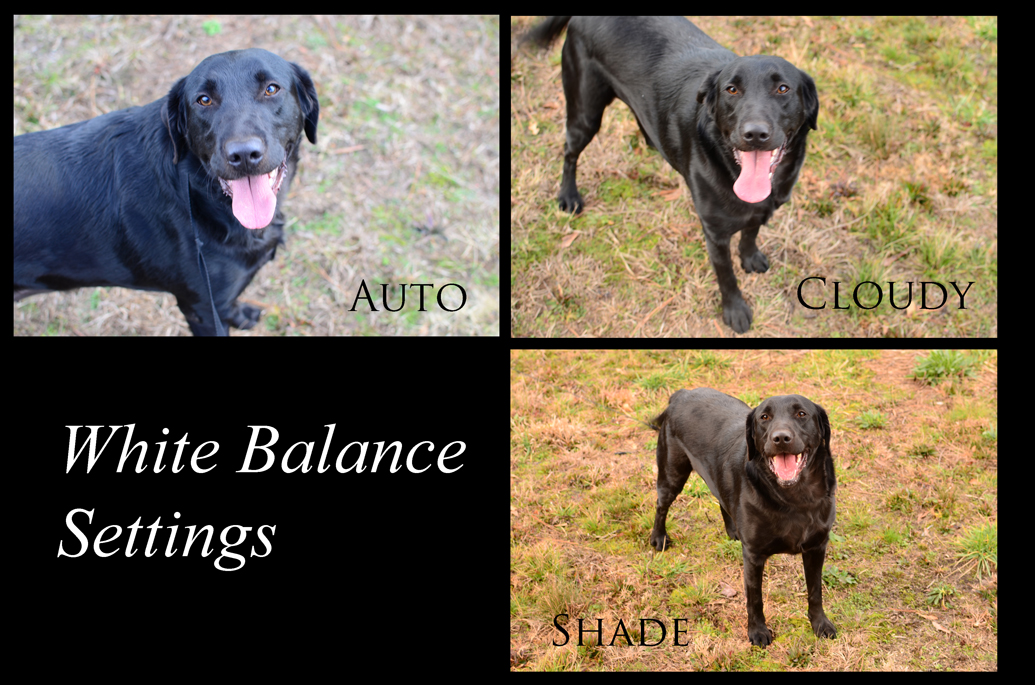
#4 Adjust the white balance settings
This is the most important tip because it is the least used. Most of us have no idea what “white balance” even is...and most photography books are so technical that their definitions are even more confusing. Basically, every light source (sun, flash, light bulbs, fluorescent lights, etc.) emits a different “color” or temperature light. Our eyes and brain automatically adjust for different light sources and we don’t see the difference; cameras try to do their best on auto, but aren’t always smart enough to get it just right. Have you noticed your pictures in the shade look bluish… photos in the house look yellowish… That is why you need to tell your camera what light source (white balance) is in use.
Most cameras have pre-defined white balance settings (auto, flash, cloudy, shade, incandescent, flourescent, etc.). Without getting too technical, simply read your camera manual, find out how to adjust for white balance, and put it on the “cloudy” setting when you are shooting in the shade (or on cloudy days). This will “warm up” your photos, taking away that bluish hue and giving a more brown and warm tone.
Most cameras have pre-defined white balance settings (auto, flash, cloudy, shade, incandescent, flourescent, etc.). Without getting too technical, simply read your camera manual, find out how to adjust for white balance, and put it on the “cloudy” setting when you are shooting in the shade (or on cloudy days). This will “warm up” your photos, taking away that bluish hue and giving a more brown and warm tone.

#5 Keep the background in mind
With shelter photos, you are trying to highlight the dog or cat for adoption. So watch out for backgrounds that are too busy, or have objects such as light poles, cars, etc. on the edges. Be careful with backgrounds that are too bright and cause the dog to be too dark or shaded. Simply taking two steps left or right, or changing from a kneeling to standing position can eliminate unwanted objects from the background.
#6 Use different camera angles
Most of the time, we walk up to an object, and from a standing position we snap the photo. That is what we humans do, walk up to something in a standing position. That is why so many photos are boring… that is how we always see things, from a standing position. Try changing your position: shoot from above, shoot at the dog’s eye level, lay down on the ground with the dog. Different angles can completely change the feel of the animal’s attitude in the picture. Pick a position which matches the animal’s personality.


#7 Learn about depth of field
“Aperture” and “Depth of Field”… there we go with more technical terminology. We don’t have time for that, we just want to know how you get that great blurry background which really makes photos jump out at you! But if you want to have a “blurry background” you are going to have to learn what aperture is, how it affects photos, and how to adjust it on your camera (you may need to buy a DSLR and a 50 mm f/1.8 lens because the point-and-shoots can't do this, sorry). Take the time to learn this one and you won’t be disappointed! But here’s the “keep-it-simple-stupid” steps: put your DSLR camera in A mode (aperture priority mode), then dial for the smallest number. (And if you do buy that 50 mm, f/1.8 lens, you’ll never take it off your camera again! Its that good!)

#8 Take tons of shots
“Your first 10,000 photographs are your worst.”―Henri Cartier-Bresson
This is the trick to being a world class photographer: take 200 shots and show people only the best one or two shots. Find out if your camera has a continuous shooting mode (or Burst mode) and just hold that shutter release button down! I keep my Nikon D7000 on the continuous high-speed setting and always fire a burst of 3 to 6 shots each time. Animals look away, camera shake, etc. …but one of the burst will be good. If I have the time, I just keep shooting and shooting; usually taking 60 to 100 shots per animal to get the one or two good ones for the website.
This is the trick to being a world class photographer: take 200 shots and show people only the best one or two shots. Find out if your camera has a continuous shooting mode (or Burst mode) and just hold that shutter release button down! I keep my Nikon D7000 on the continuous high-speed setting and always fire a burst of 3 to 6 shots each time. Animals look away, camera shake, etc. …but one of the burst will be good. If I have the time, I just keep shooting and shooting; usually taking 60 to 100 shots per animal to get the one or two good ones for the website.
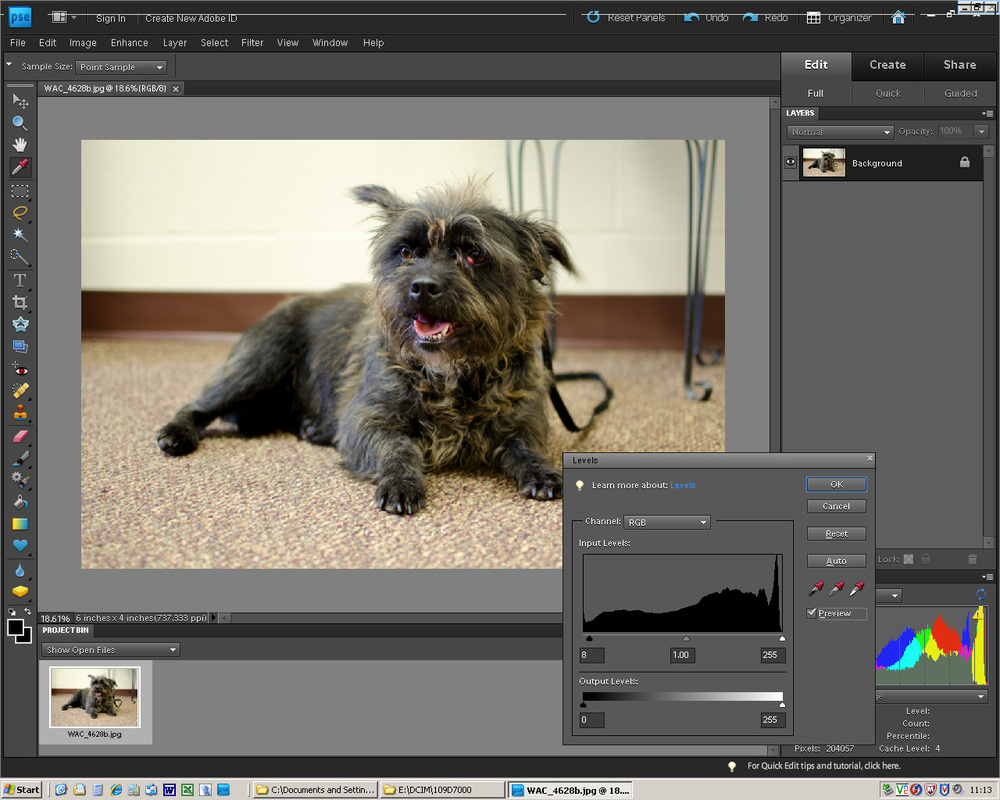
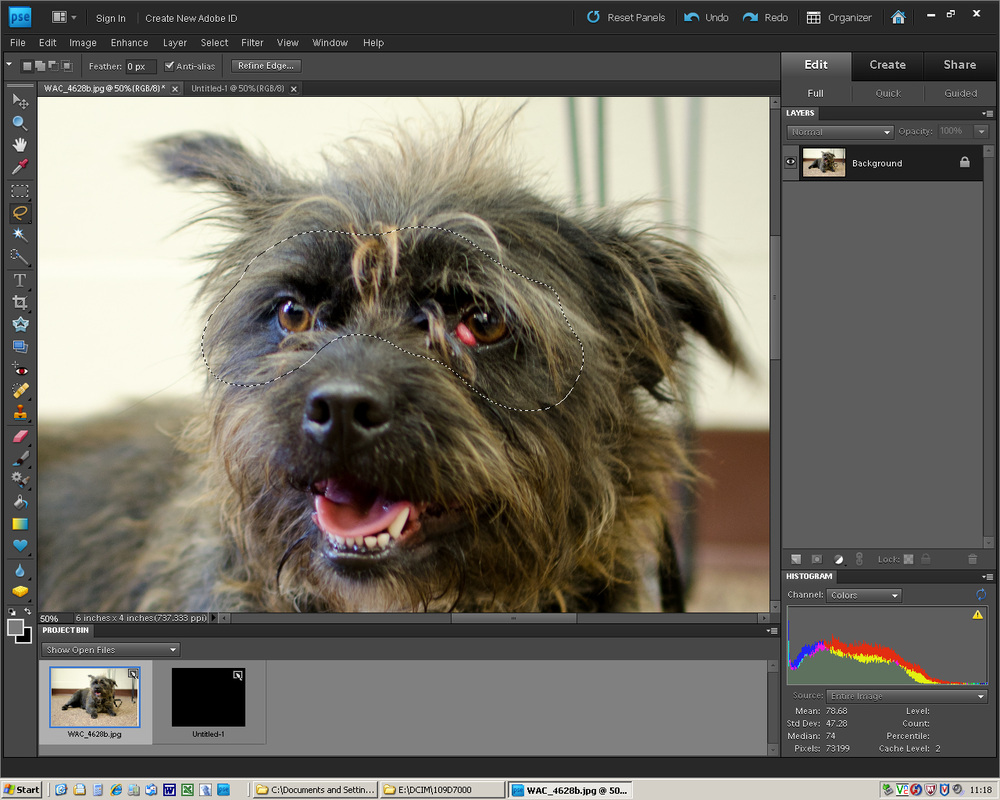
#9 Utilize editing tools
Obviously, you have to have Photoshop or some type of photo editing software for this one… and you have to learn how to use it! But of all the countless tweaking you can put a photo through in Photoshop, I always… always check and adjust the levels, and usually brighten and sharpen the eyes. On an animal shelter webpage, the eyes say a lot: the sad eyes draw them in, pull their heart strings; bright clear eyes speak about the animal's health. Learn how to select the eyes using the lasso selection tool, feather your selection, then on the quick edit menu, simply slide the "shadows" and "sharpening" sliders to the right (but not too far!). There are plenty of tutorials and articles about editing in Photoshop. Do some homework, its worth it!

#10 Look at what others are doing
Get on the internet (you’re there already) and search other shelter's sites. Check out Flickr, Shutterfly etc. for pet and dog photos. Google "pet photography" and see what the professionals are doing. You’ll get some great ideas. Try to replicate their shots. Challenge yourself. Don’t just keep doing the same thing over and over.
|
Contact me here:
|
|
 All content is ©williamwisephoto.com. Please don't steal images. My images are available at dreamstime.com. Stock sales go into the shelter photography program.
|

In December 1993 I came to know the Designer and Creator of this wonderful planet and its creatures: Jesus Christ.
|
Donations help support the animal shelter adoption photography equipment and adoption website hosting and domain fees. Thanks for your support!
|